
How to Connect Website Forms to a CRM and Route Leads
A website form should do more than send an email. To connect website forms to a CRM, map each form field to the right CRM field, then set rules to route submissions and create or update records. Forms can collect enquiries, contact details, feedback, membership information and registrations, giving your team structured information to act on instead of another message to process manually.
It’s easy to see why businesses start with email notifications: they’re familiar and quick to set up. But reviewing messages, entering details and passing enquiries to the right person can slow things down. A well-planned connection moves that work into your CRM, where submissions can be organised and followed up through your existing process.
This guide explains how to connect website forms to a CRM, choose and map the information you collect, and set up lead routing. You’ll also learn when to create a new record, enrich an existing one or update details, so form submissions become useful, organised CRM data.
Key Takeaways
- Choose form fields that capture useful details for enquiries, feedback, memberships or registrations without collecting information your team won’t use.
- Map each form field to the right CRM field so submissions arrive in a consistent, usable format.
- Set routing rules to direct leads to the right team or person, rather than relying on someone to forward each enquiry.
- Use matching rules to spot potential duplicates and decide whether a submission should create a new record or update an existing one.
- Test the full process, from submitting a form to checking the CRM record and lead assignment, before relying on the integration.
Lead generation, contact, feedback, membership, and registration forms
Start by identifying what each form needs to do. A quote request, feedback form, membership application and event registration need different fields and follow-up paths.
- Separate forms by purpose. A lead generation form might capture a name, contact details and the service requested. A contact form can ask why someone is getting in touch, while a feedback form needs space for comments. Membership and registration forms may also need fields for membership type or event selection. Keep each form focused so people aren’t asked for irrelevant details.
- Decide what happens after submission. With manual lead management, staff review email notifications, enter customer details and distribute enquiries individually. Website forms may send details to an administrator by email hourly, daily or weekly, leaving the team reliant on inboxes and manual hand-offs. Note who currently receives each form and what they do with its information.
- Match the form’s purpose to a CRM action. A quote request could create a sales lead, while feedback could be recorded for the team responsible for customer experience. A membership application or registration may need its own category and follow-up process. Set the action according to the submission type, rather than sending every entry to one undifferentiated lead queue.
-
Automate lead assignment and follow-up
Set a rule that assigns each enquiry to a team or person based on a clear detail, such as the service selected on the form. Then configure a follow-up trigger, such as an acknowledgement message after a quote request arrives. Check that every option routes to the intended recipient, and make sure unrecognised or incomplete submissions aren’t left unassigned.
-
Track lead communications and status
Record each submission’s owner, status and follow-up activity in the CRM. For example, a new enquiry could move from “received” to “contacted” after a staff member logs a call. Keep email or call notes with the relevant record so the next person can see what’s happened. Use clear status labels, and don’t treat an automated acknowledgement as a completed sales conversation.
- Test every form path. Submit a test entry for each form type, including different service selections and membership or registration options. Confirm the details reach the CRM, the intended person or team receives the lead, and the right follow-up trigger runs. Also test a submission with an optional field left blank, so missing information doesn’t break the workflow or hide the enquiry.
Mapping form fields to CRM records
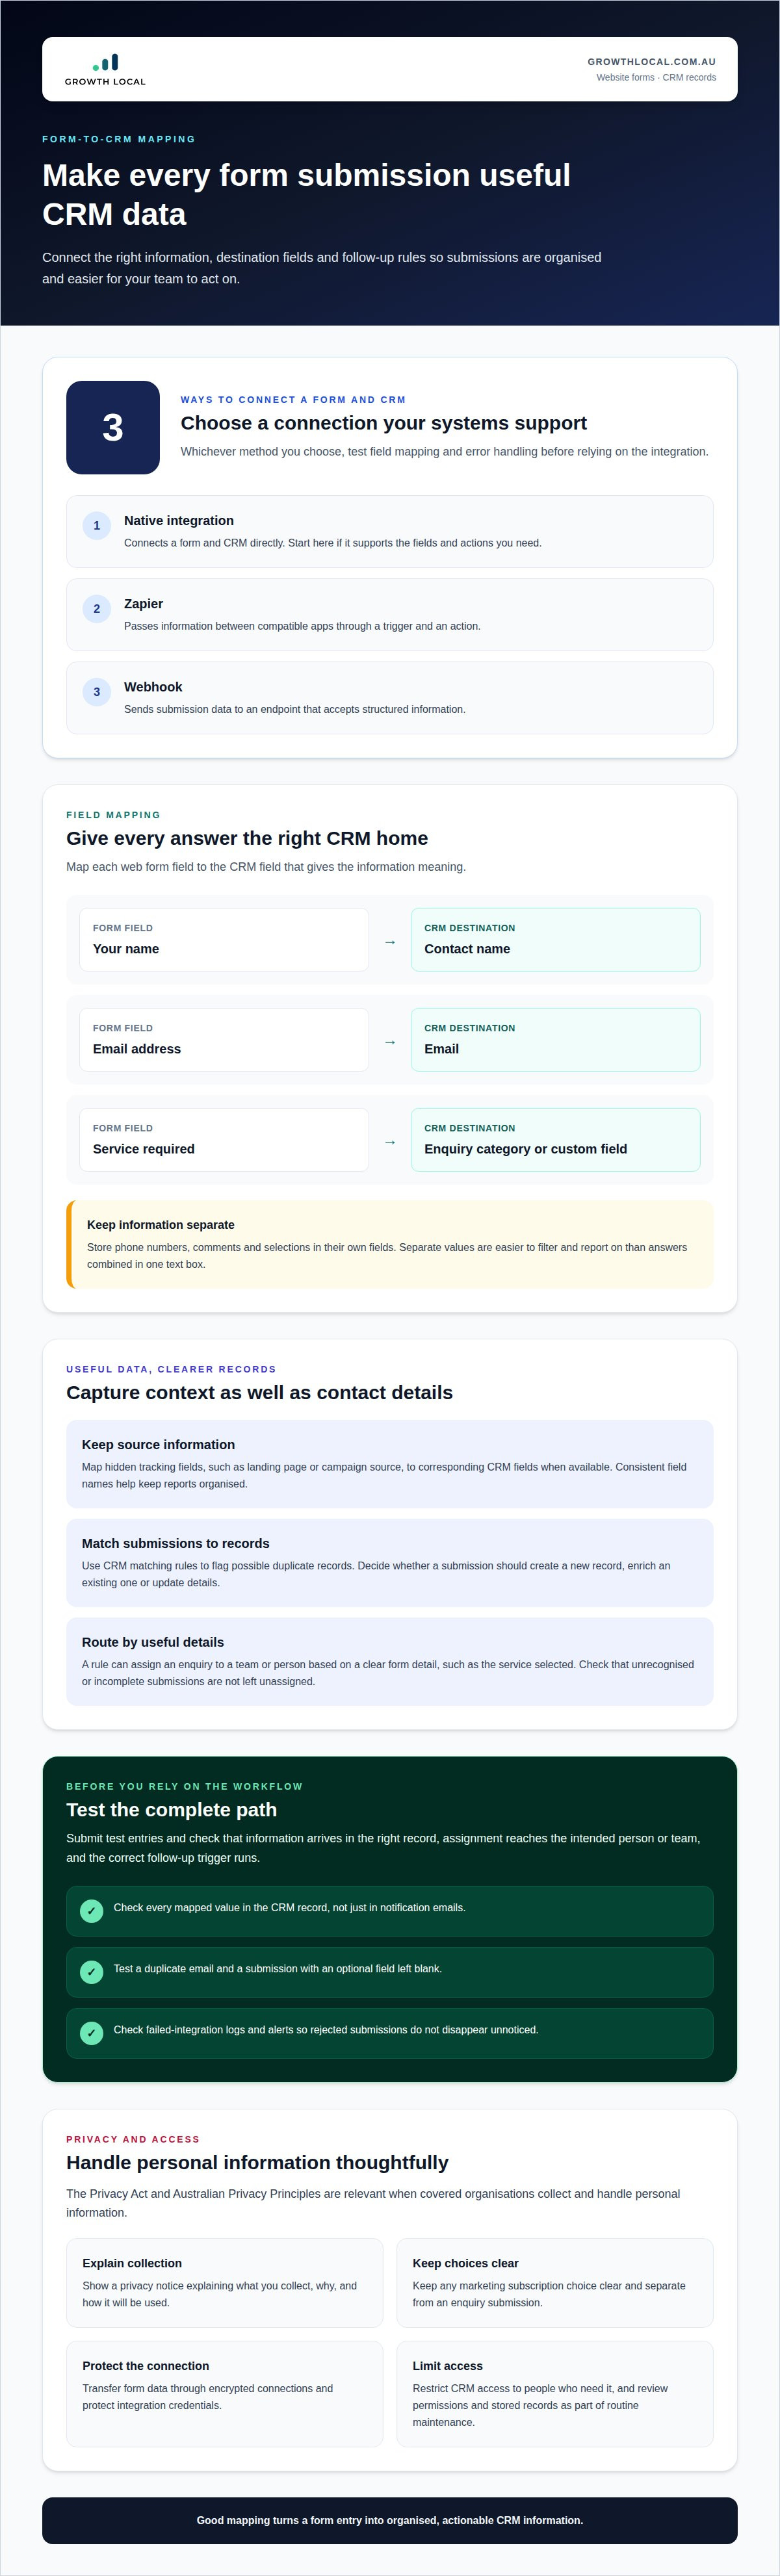
Map each web form field to the CRM field that gives it meaning. A correct integration transfers submitted information automatically, while poor mapping can create incomplete or confusing records.
The Privacy Act and Australian Privacy Principles are relevant when covered organisations collect and handle personal information. Build forms that explain why information is collected, limit access, and support secure management of CRM data.
Before someone submits personal information, show a privacy notice explaining what you collect, why, and how it will be used. Keep any marketing subscription choice clear and separate from an enquiry submission.
A native integration connects a form and CRM directly. Zapier can pass information between compatible apps, while a webhook sends submission data to an endpoint. Choose a method your systems support, then test field mapping and error handling.
Use CRM matching rules to flag possible duplicate records, and add spam controls such as a CAPTCHA where suitable. Check failed-integration logs and alerts so rejected submissions don’t disappear unnoticed.
Transfer form data through encrypted connections, protect integration credentials, and restrict CRM access to people who need it. Review permissions and stored records as part of routine system maintenance.
- Match each field to a CRM destination. Map “Your name” to the CRM’s contact name field, “Email address” to email, and “Service required” to an enquiry category or custom field. Keep phone numbers, comments and selections in their own fields. Don’t combine answers in one text box when the CRM needs to filter or report on them separately.
- Build the web form around the data. A drag-and-drop form builder can add, remove and reorder fields without changing the CRM structure. Give the form a useful title and short description, then customise colours to match the website and keep labels readable. For example, a “Request a quote” form should make its purpose clear before someone starts filling it in.
- Capture source information. Map hidden tracking fields, such as landing page or campaign source, to corresponding CRM fields when available. These values can show whether a record came from a service page, an email campaign or another website entry point. Keep field names consistent across forms so reports don’t split one source into several labels.
- Choose and test the connection method. Start with a native integration if it supports the required fields and actions. Zapier can connect compatible apps through a trigger and action, while a webhook suits a system that accepts structured submission data. Submit a test entry and confirm every mapped value appears in the intended CRM record, not just in notification emails.
- Audit the complete path. Review the form, integration settings, access permissions and CRM record together. Test a duplicate email, a spam-like submission and a failed connection to see how each is handled. Confirm that errors are visible to the team and that valid leads remain recoverable. For help planning the setup, discuss your CRM integration.
Creating, enriching, and updating CRM records
Set a clear rule for what happens after each website form submission. Depending on its matching rules and the information provided, the CRM can create a new record or update an existing one.
- Choose when to create a record. Create a new CRM record when a submission represents a new contact and no suitable match exists. For example, a first-time quote request could create a contact and an associated sales opportunity. Map the form’s email address, name and service enquiry to the correct fields so the record is useful from the first response.
Keep the creation trigger specific. A feedback form might create a service case rather than a sales opportunity, while a registration could create a participant record. If every form creates the same record type, the CRM can fill with entries that don’t fit the team’s workflow.
- Set matching rules before importing submissions. Use an email address or another suitable identifier to compare a new entry with existing CRM records. Matching rules can identify potential duplicates, but a shared name alone may not be enough to decide whether two entries belong to the same person. Define what the system should do with a likely match, such as flagging it for review.
Test the rule with realistic examples. Submit one form using an existing contact’s email address, then another with a different email and similar name. Check whether the CRM distinguishes a possible duplicate from a genuinely new contact, rather than merging records without enough evidence.
- Update only the fields the form can support. If an existing contact submits a new service enquiry, update relevant details without overwriting unrelated information. A new phone number may replace an old one, while a fresh enquiry should usually add context rather than erase earlier notes. Decide field by field whether a submission replaces, appends to or leaves existing data unchanged.
- Enrich records with useful submission context. Add the form type, enquiry category and submitted message to the appropriate CRM fields. For instance, record a contact’s interest in a particular service alongside their existing contact details. This gives staff context before they respond and helps them identify related opportunities.
Separate information supplied by the person from internal sales notes. A form answer belongs in its mapped field; a staff member’s assessment belongs in the CRM’s notes or activity history. Keeping them separate makes later updates easier to interpret.
- Check the outcome after each test submission. Confirm whether the CRM created, enriched or updated the expected record. Review the email address, contact details, enquiry content and record history. Also check what happens when a submission has no email address or omits an optional field. A defined fallback helps prevent incomplete data from causing an incorrect update or an overlooked lead.
Benefits of connecting website forms to a CRM
A CRM connection turns form submissions into structured information your team can use. The benefits go beyond avoiding manual entry: they include clearer reporting, more organised follow-up and better insight into which website activity creates opportunities.
- Reduce repetitive administration. Automating website lead-data capture can save a business 250 hours annually. Instead of copying details from emails into a spreadsheet or CRM, staff can spend that time responding to enquiries or progressing existing work. For example, a submitted service enquiry can appear as a CRM record without someone retyping the visitor’s name, contact details and request.
That time saving depends on removing repeat tasks from the process. If staff still copy form details into another system, the integration hasn’t removed the main bottleneck. Trace a submission from the website to the team’s next action to find any remaining manual steps.
- Give leads a clearer path to follow-up. A form submission can trigger an assigned task, acknowledgement or team notification. For example, a quote request can create a task for the relevant salesperson, while a general feedback form goes to the team responsible for customer experience. Each submission has a defined next action instead of sitting among unrelated inbox messages.
Clear ownership also helps managers see which enquiries need attention. A CRM record can show who owns the lead and whether someone has started a conversation, making hand-offs easier to follow.
- Build useful reports from structured data. CRM reports can use structured lead data collected through automated integration. If a form records the service requested and the page where a visitor submitted it, reports can group enquiries by service or source. That gives managers a more useful view than a folder of emails with inconsistent subject lines.
Keep categories consistent across forms. If one page calls a service “solar” and another records “solar energy”, reporting may split similar enquiries into separate groups.
- Connect marketing activity to incoming enquiries. Store campaign and landing-page details alongside the lead when your integration supports those fields. For example, a Google Ads enquiry can be distinguished from one arriving through an organic service page. Marketing teams can then review lead volume and quality by source instead of judging campaigns only by visits.
Use the same source labels across forms. Consistent tracking makes campaign comparisons clearer and helps teams decide where to focus their marketing effort.
- Make follow-up more informed. A CRM record can bring the visitor’s enquiry, selected service and communication history together. Before calling, a team member can see whether the person asked about a specific service or has already received a response. The conversation starts with relevant context, rather than requiring the visitor to repeat their request.
The practical benefit is a connected workflow: capture the enquiry, assign an owner and use its details to guide the next conversation.
How do I connect a website form to a CRM step by step?
Work through the setup in order, from choosing the form’s purpose to testing the complete submission path. A successful connection captures the right information, creates or updates the right record, and directs it to the next action.
- Choose the form and CRM workflow. Start with one form, such as a service enquiry form, and decide what should happen after submission. For example, the CRM might create a lead, assign an owner and record the enquiry category. Define the intended outcome before changing settings so you can tell whether the finished connection works.
- List the information the form collects. Write down each field, such as name, email address, phone number and service requested. Keep essential details separate from optional questions. If the form asks about several services, use clear selectable options and decide where each answer should appear in the CRM.
- Select a connection method. Check whether your form platform and CRM offer a native integration that supports the actions you need. If not, consider an automation platform or a webhook supported by both systems. Compare the required fields, record actions and error handling, rather than choosing solely for setup convenience.
- Connect the systems and map fields. Authorise the connection using the relevant account permissions, then match every form field to a CRM destination. Map “Email address” to the contact email field and “Service requested” to an enquiry category. Don’t map unrelated answers to one field, as that makes records harder to search and report on.
- Set record and routing rules. Decide whether a submission creates a new record or updates a potential match. Configure lead ownership using a useful condition, such as the service selected. Add a follow-up task or notification where appropriate, and define what happens if the integration can’t match or assign a submission.
- Submit test entries. Use sample information to test the main form options, including an existing contact and a new contact. Confirm the CRM stores answers in the correct fields, follows the expected record rule and assigns the lead correctly. Test optional fields left blank, too, so missing answers don’t derail the workflow.
- Review errors and maintain the workflow. Check the integration’s activity or error log after testing. Confirm failed submissions are visible and can be recovered, rather than silently disappearing. Repeat the test after changing form fields, CRM rules or connected accounts, since any of these changes can affect the submission path.
Growth Local
Growth Local helps businesses connect website enquiries with the systems they use to manage and follow up leads. If form submissions still need manual sorting, or your CRM records and routing rules aren’t working together, Growth Local’s Lead Generation System Setup and CRM Setup can help organise the process. Marketing System Setup can also connect lead capture with broader marketing workflows, giving enquiry information a clearer path from submission to follow-up.
This support is useful when you’re setting up a new connection or fixing gaps in an existing one, such as misrouted leads, inconsistent records or manual data entry. Contact Growth Local to discuss your website forms and CRM setup.
Make your lead process ready to grow
The next step in learning how to connect website forms to a CRM is to make the setup part of your operating routine. As your services, campaigns and team responsibilities change, review whether each form still collects useful information and sends it into the right workflow. A form built for today’s process can become a bottleneck if nobody revisits its fields and routing rules.
Assign someone to review the setup and record changes to fields, triggers and CRM actions. That gives your team a practical way to catch broken connections early and keep new enquiries moving through a process that still fits the business. Start with the form that creates the most friction, then improve the rest in manageable stages.
With a well-maintained process behind each submission, your team can focus on useful conversations and steady growth.
Frequently Asked Questions
What can webforms be used for?
Webforms can collect information for sales, service and customer administration. A quote request can capture a person’s project details, while a callback form records when they’d prefer contact. A downloadable guide form can collect an email address to deliver the resource. After a service is completed, a feedback form can gather comments about a specific job. Choose the form type to suit the task and the team’s next action.
Why connect website forms to your CRM?
Connecting forms to a CRM gives sales and marketing teams a shared view of incoming contacts and their interests. For example, a person who requests a solar quote can be grouped separately from someone downloading a general business guide. That context helps teams tailor later conversations and understand how a contact’s needs develop. It also gives managers a clearer basis for deciding which types of enquiries fit their current services.
What form fields and CRM field mappings are needed to capture leads correctly?
Use fields that identify the contact and explain their request, such as name, email address, service interest and a free-text message. Match each answer to a CRM field with the right data type. For example, map a service dropdown to a consistent category field, not a notes field. Keep consent preferences separate from general contact details so marketing choices can be recorded and interpreted clearly.
How can I test and troubleshoot website form submissions sent to a CRM?
Submit a test entry for each form option, then inspect the resulting CRM record and integration activity. If a field is blank, check its mapping and whether the form requires an answer. If the whole submission fails, review connection permissions and error logs. Also check notification delivery and spam folders. Retest after changing a form field or workflow, since either change can affect how information is transferred.


